Page 46 of 51 FirstFirst ... 364445464748 ... LastLast
Results 451 to 460 of 502

Thread: Hunty's Jeep JK Extreme

  1. #451
    Club Member Hunty's Avatar
    Join Date
    Apr 2009
    Location
    Wahroonga, Sydney
    Posts
    902

    Default Does my @ss look big in this bar?

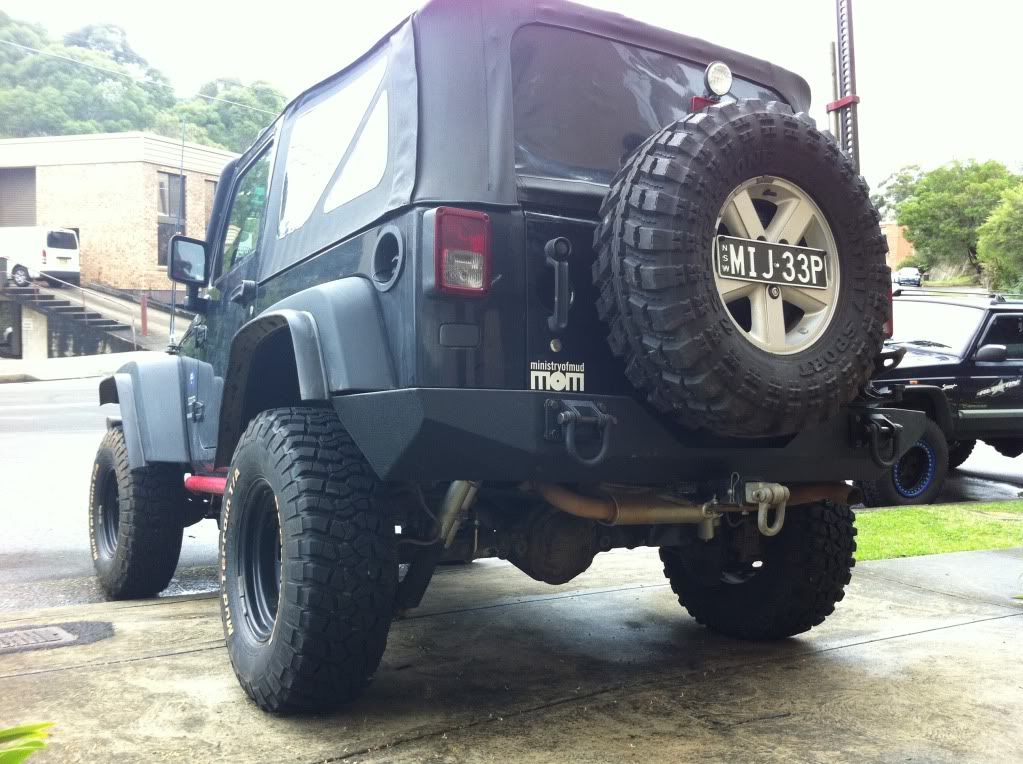
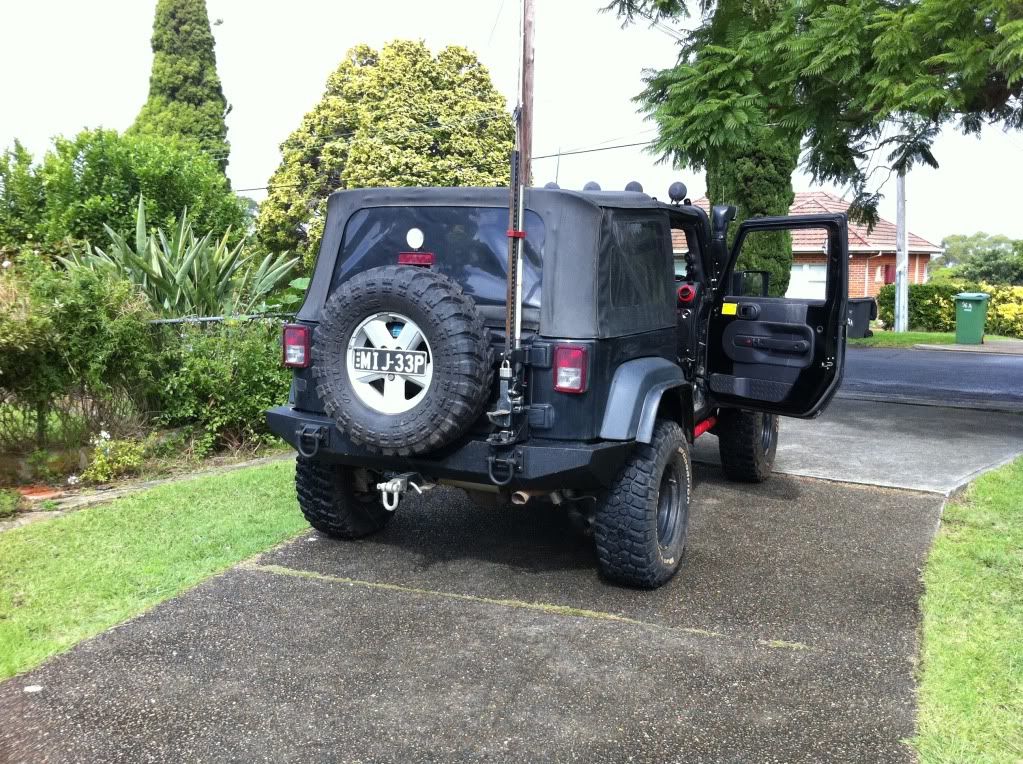
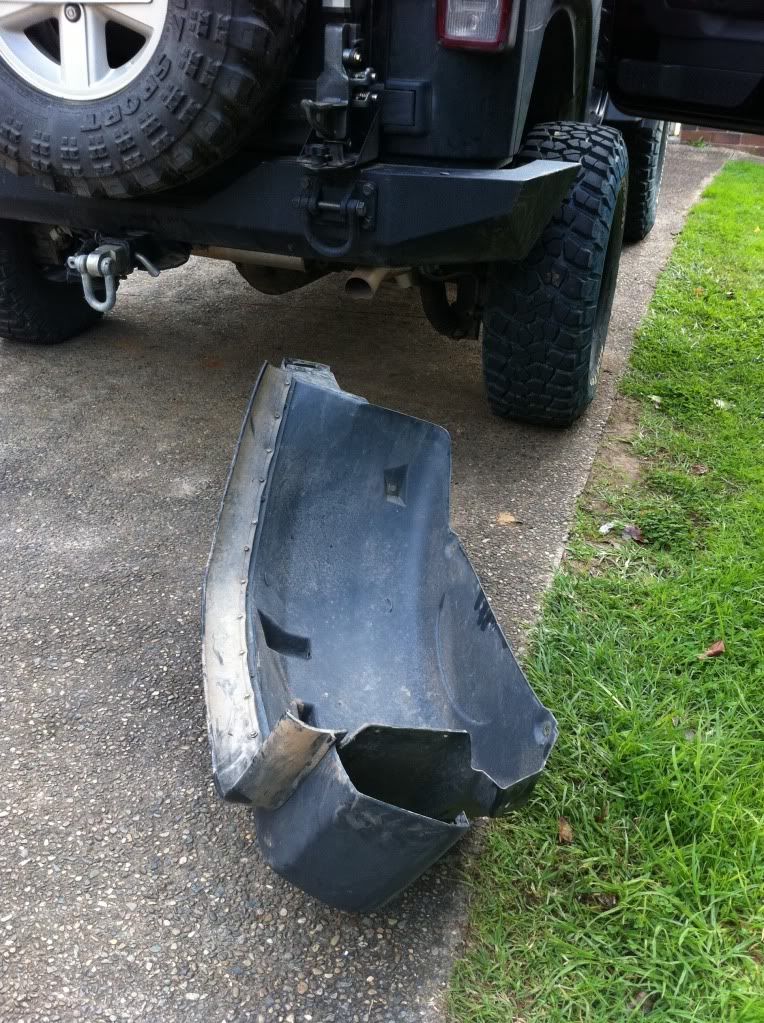
    I finally got a decent rear bar, thanx heaps to Wooders for the great advice and awesome deal!
    Why wooder you shop anywhere else!


    I got to keep my factory tow bar as well.
    It is pre drilled and threaded for a tyre carrier and best of all IT IS TOUGH!
    I love the shape and the hummer looking tow points
    It is extremely well manufactured and perfectly finished!
    Cheers Hunty


    Luv My Jeep!

  2. #452
    Club Member Hunty's Avatar
    Join Date
    Apr 2009
    Location
    Wahroonga, Sydney
    Posts
    902

    Default 35's

    Hi Guyz
    heres some pix of my heap on 35's Toyo AT's very nice tyres - I highly recommend them very good on road OK off road (just don't go near mud - LoL) - these pics a blast from the past - still have the factory park bench!
    cheers Hunty


    last weekend @ Jenolan state forrest - back down on 33's
    Luv My Jeep!

  3. #453
    Club Member Hunty's Avatar
    Join Date
    Apr 2009
    Location
    Wahroonga, Sydney
    Posts
    902

    Default JK Fender gold plated clips

    Hi Guyz
    I have been slowly over the past 3 years beating up on my plastic fantastic fenders, almost everytime I go wheelin I rip & crunch & brake those little clips that hold em on.


    My drivers side rear fender has been just hanging on with 3 or 4 out of 15 clips now for over a year and on the weekend I let my "L" Plater son do some of the wheelin and between him & I we finally tore it totally off.


    I went to buy some of these little clips from my local Chrysler blokes and too my (and the spare parts guyz) utter dismay discovered that the list price on these little plastic clips is $11.78ea - I asked for 20 of them (before he figured out the price) as I wanted to replace all of them on the drivers rear and have a few spares that I could keep in my trail repair kit. Do the math for 20 clips;
    $235.60c - There is now way in hell that I will pay that for what amounts to a simple bumper clip.


    I walked across the road to Pacific spares (like repco) and asked if they stocked bumper clips - they did and I bought 18 for $4.75 tot saving = $230.85


    I simply clipped them into my fender - had to do a bit of Mcgyvering lol - which amounted to placing a small piece of gaffa / 100mph tape to hold them exactly in place as I reinstalled the fender, I realise that so many of you could figure out far better ways to reinstall the fender but I am lazy and needed my heap back on the road ASAP as its my daily drive. it took me less than 2 min to bodge them back on and only $4.75 they feel like they are on solidly and have survived some pretty full on wheelin already - I hope this bodggy is useful Jeepers!
    cheers Hunty


    Luv My Jeep!

  4. #454
    Club Member Hunty's Avatar
    Join Date
    Apr 2009
    Location
    Wahroonga, Sydney
    Posts
    902

    Default Must watch vid for Dana30 JKers & How to replace uni

    Hi Guyz
    I was out wheeling last weekend in the Watto's, B+ grade trails in low range 1st, scrambling up a fairly steep hill and heard a very soft metallic sounding tick / crack,
    so I immediately switched off the engine and did some investigating, pulled & pushed just about everything - nothing found, so I decided to drive on carefully and get off the trails and go home!


    Returned to 2wd and the faint clicking went away, OK that tells me the problem is in the front end, so I upon investigation i discovered some damage to the drivers front UNI joint, so before I fixed it I gaffed my iphone4 to my bull bar and made the video below, Hopefully if you watch the vid and commit the sound to memory when you hear it on your Jeep (and you will eventually - its not if - its when) you will be able to quickly recognise it and switch to 2wd before you damage the uni ears, my repair cost me a uni joint and my time. I have seen several other JK'ers ignore the warning signs and then have to replace hubs & axels - a lot more expensive than a Uni Joint.


    http://www.youtube.com/watch?v=mV7cH6aDxto


    Heres how I replaced my front uni
    Take 1
    Started with a handful of smart@ss pills and decided that I could change it without removing the front wheel, disc brakes or hub, see pix below. Those of you with an ounce of mechanical expertise or have replaced a JK uni before - feel free to start laughing Now. Anyway 3 hours later 2 broken screwdrivers and a broken jimmy bar all I had managed to do was to remove the circlips!


    Take 2 LoL
    1. Jack up Jeep, chock wheels, insert jackstand, take off front wheel and slide it under the jeep as extra safety should the jack stand fail
    2. Remove the 2 bolts that secure the brake callipers, remove callipers and secure them out of the way.
    3. Remove the 3 unusually shaped bolts that secure the hub to the Knuckle
    4. Very carefully remove the hex head bolt that secures the ABS / TC/ ESP sensor - its plastic so be very careful and unclip it from the 2 guides and secure it in a safe place.
    5. Carefully pry off the hub from the knuckle and slide out the hub, uni and axel.
    6. Optional - I removed the drag link to give me better access - probably wasted my time - D'oh - still feeling dumb from my first attempt LoL
    7 Place in a vice or similar and remove all 4 circlips then wearing suitable eye protection get an old useless socket and place it on the end cap of any of the unijoint end caps and beat on it neanderthal style hard until you pop the opposite end cap out. repeat 3 more times until all 4 end caps have been whacked out!
    8. inspect all 4 ears for wear / damage and in my case burs - lightly sand with fine paper to clean out any surface blemishes and lubricate with a few drops of oil
    9 unpack new uni joint and extremely carefully remove all 4 end caps DO NOT DISTURB the needle bearings! . place the uni joint into the axel end first and insert 1st endocarp - gently tap it in place with a hammer - install the next end cap bearing - invert and gently tap in opposite end end cap bearing. I tried to use a G clamp - dumb idea - my mechanic told me just to tap them in gently and in the end that worked out to be the best solution.
    10. install circlips - word of caution my circlips were to fat to insert so I put them on a diet (thicknesser) and reduced them to half their original thickness before inserting.
    11. repeat process above for hub
    12. reassemble - basically steps 1 to 5 in reverse LoL


    Luv My Jeep!

  5. #455
    Club Member Hunty's Avatar
    Join Date
    Apr 2009
    Location
    Wahroonga, Sydney
    Posts
    902

    Default Front drive shaft replacement

    Funny Story; well I wore out a front drivers side UNI (see my dumb@ss yet successful attemp to repair - earlier post) and after I replaced it I went out for a test drive on the grass field behind my office, as I was "testing" aka performing the technical manoeuvre know as grass D'ohnuts when I heard a new noise - sounded like a dead / dying CV. sure enough I had just killed my front driveshaft CV at the transfer case.


    After much research I decided to replace my factory shaft with a Double Cardan from Wooders Garage, much stronger and should last more Km's.


    Thankfully the old shaft gave me plenty of notice! - infact I went wheelin several times with it complaining whilst I waited for the replacement to arrive.


    Replacing the front shaft is a pretty easy / straight forward job.


    To make the repair you will need;
    1 x small socket to remove the million little bolts that hold the CV to the transfercase adapter
    1 x Large Socket to remove the M22 nut in the centre of the flange / adapter see pic


    My 2 cents / hopefully helpful advice.
    Firstly you will need to remove the bash plate, I did this repair as I do everything, (without a hoist in the driveway) I removed 3 of the 4 bolts that hold it in place then grabed a handful of smart@ss pills, and just loosened the 4th bolt enough to swivel the bash plate out of the way - I did this because I did not want to have to lift it back in place.


    Disconnect / Drop the front driveshaft uni first by removing the 4 bolts then put your transfer case in neutral - this will allow you to remove one of the millions of little bolts before you rotate the shaft to remove the next little bolt and so on until they are all out


    When removing the centre nut from the adapter flange put the transfer case back into 4L so you can swing on it to loosen it and get it off.


    When swapping out flanges be sure to carefully remove the fat little rubber Oring / seal and carefully install it into your new flange - As a total dumb@ss I missed this important step , and as I was packing away all my tools and feeling well pleased with my efforts I noticed the "stupid" little Oring was still embedded in my old flange D'oh, so back on the jack stands, remove the bash plate remove front uni.........blah blah blah....... dumb@ss LoL


    If you have any mechanical aptitude you should be able to do the job in around 90min's (unlike me who took a little bit longer, ok a lot longer - LoL)
    Cheers Hunty
    Luv My Jeep!

  6. #456
    Club Member Hunty's Avatar
    Join Date
    Apr 2009
    Location
    Wahroonga, Sydney
    Posts
    902

    Default Ipad - yet another location on test

    Hi Guyz
    I am still looking for the perfect place to install my Ipad, here is my latest evolution


    I can still operate my electric windows and the stereo, just! LoL


    Will the Apple Ipad GPS function correctly? will I love it in its new location ? I guess time will tell.


    any thoughts / suggestions
    cheers Hunty


    Luv My Jeep!

  7. #457
    Club Member Hunty's Avatar
    Join Date
    Apr 2009
    Location
    Wahroonga, Sydney
    Posts
    902

    Default DBoR AeroForce Gauge is Awesome

    Ive been using my aeroforce gauge now for 6 months and am very happy with it


    The Aeroforce gauge can be setup to show two things at once or cycle through as many as you like - I mainly use it to monitor battery voltage and water temperature on road and for off road I have it cycling through a bunch more;


    When im in the slop I select water temperature and steering angle
    water temp so I can see if i have clogged up the radiator with mud as the std JK gauge will show "12oclock" all is well for any temperature between 85 and 112 degrees C


    and steering angle so i know when I have the wheels pointing straight as those of you who wheel in the mud will know - sometimes you can have the wheel 1 complete turn from straight and have almost NO idea!


    When winching I use the aeroforce gauge to bump up the idle - you can input what ever RPM you want - I usually input 1850 which is a apparently the rpm needed to get maximum output from the alternator.


    You can program your Jeep for different gears and different tyre size to correct you car computer and speedo readings.


    Reading and clearing DTC - fault codes


    Another awesome feature is - the aeroforce gauge has 2 annalog inputs that you can connect whatever you want to - I am planning to install a long range fuel tank and will connect the sender up to the 1st of the 2 annalog inputs - i have done some research and have determined that the gauge will display anything - 0 - 5v. - I may have to consult with the guru's Mightymouse and Nemesis but I feel positive that I will be able to make it work eventually.


    it is brilliant, I still have my scan gauge but now it lives in my tool box and comes out only when I want to assist my friends in diagnosing their Heaps.


    There are 2 super bright Led's that can be configured to light up in any condition or combination of conditions - I have mine set to light up on high temperature (over 100 degrees C) and / or high RPM.


    If you want one contact the guys at Double Black off Road DBoR and they will take good care of you.
    Cheers Hunty
    http://www.doubleblackoffroad.com/main.php
    cheers Hunty


    ps
    last pic shows ipad in its old location


    pss LoL - The anti swear / bad language filter / feature of this website will not let me refer to the non digital inputs by their correct name - lmao - i guess it thinks that im calling someone a bad name - easy fix - I just spelt it with 2xN's
    Luv My Jeep!

  8. #458
    Club Member Hunty's Avatar
    Join Date
    Apr 2009
    Location
    Wahroonga, Sydney
    Posts
    902

    Default My Best mod ever

    Quote Originally Posted by dan84 View Post
    Hey Hunty, whats the red circle near your door lock switch on the right hand side that looks like an LED?

    Hi Dan
    its my best mod ever - it shuts up the stupid door open chime


    What the hell were Chrysler thinking!!! - who on earth wants to listen to that annoying chime just because they have opened their drivers door!


    This mod will give you a switch to decide if you want your Jeep JK factory or quiet!


    The only downside to this mod is - if you silence the chime you also disable the interior light sensor -(only on the drivers side) the light will still come on from the light control on the steering column and the passenger door!


    What you need
    1. Scotch Lock 25c
    2. Red switch - Jaycar $2.95c
    3. small piece of wire and some electrical tape.
    4. Peace and Quiet - priceless!


    Tools
    1. philips head screw driver for the 4 screws in the door
    2. allen Key for the hex head inside the door release
    3. wire stripper and Soldering iron / solder


    Step 1
    Remove inside door skin - remove 4 screws and 1 hex head bolt
    gently pry off the trim starting from the bottom of the door - just pull and you will hear the plastic locks popping of 1 at a time - go slow and and after you have released the bottom of the skin lift the door skin up to clear the bottom of the window lip - carefully remove the plug to the central locking switch.


    Step 2
    cut the purple wire - sorry the photo is little blurred


    Step 3
    drill hole for switch - any where you like! - theres plenty of options re space for a switch!


    Step 4
    insert and wire up switch to purple wire.


    Step 5
    replace door trim.


    Step 6
    Brag to your friends that you can open your drivers door and not have to put up with the endless annoying chime and the stereo stays on


    Enjoy
    cheers Hunty


    Luv My Jeep!

  9. #459
    Club Member Hunty's Avatar
    Join Date
    Apr 2009
    Location
    Wahroonga, Sydney
    Posts
    902

    Default Warning to JKers re Disco's & Hunty's Darwin Award

    Of all the Dumb@ss things I have done to 4x4's over the years this mod is my most embarrassing and most shockingly dangerous ergo the WARNING;


    Do NOT install disconnects as per the following pictures as you run the serious risk of entering yourself for your very own Darwin Award!


    When new the lower section of the fixed part of the (Dumb@ss) disconnect will remain vertical when disconnected, however as the wheelin miles start to add up it will get progressively looser until it will fall forward under braking and totally block your steering!!! - God help you if you are on the black stuff @ 80kph heading to the servo to air up when it it falls forward!


    Solution - JKS disconnects, I got mine from "Wooders" for less than I could get them off EBay USA


    Install tip - when tightening the centre lock nut wedge something (I used my little shifter) between the bottom disco and the Jeep to ensure it stays nicely in line with the top.
    Cheers Hunty


    Luv My Jeep!

  10. #460
    Club Member Hunty's Avatar
    Join Date
    Apr 2009
    Location
    Wahroonga, Sydney
    Posts
    902

    Default Who has the best guard / flare tyre coverage system?

    I use the bush ranger stick on flare you can get it from most 4x4 suppliers - i notice arb now sell it to


    heres why i say its good on a JK;
    1. I needed extra coverage to be legal and it does that.
    2. When I first did it there was little else available for a jk.
    3. Some of the awesome new products available for the JK arnt LoL - ive got mates who have dropped big bux on "Awesome new products" and have broken them on the first occasion they slide into a high sidded rut
    4. I have squashed crunched slid on rubbed and bangged my flares so many times I cant count - there still there
    5. my heap looks mild not wild with the factory flares and rubber ext and i like that because it doesnt scream out to the boyz in blue look how high im lifted!
    6. its cheap!
    7. Im waiting to see what will be the best aftermarket alternative and then Ill buy that - and im still waiting
    cheers Hunty


    Luv My Jeep!

Tags for this Thread

Bookmarks

Bookmarks

Posting Permissions

  • You may not post new threads
  • You may not post replies
  • You may not post attachments
  • You may not edit your posts
  •